Mastering Australia Papercutting SVG and 3D Australia Layered Designs for Professional Craft Workflows
Integrating digital design assets into physical production requires more than just a cutting machine; it demands a clear understanding of file compatibility, material behavior, and workflow efficiency. The Australia Papercutting SVG and 3D Australia layered designs represent a specific category of vector assets optimized for multi-layered fabrication. These files are not merely decorative images but functional blueprints for CNC routers, laser cutters, and desktop cutting plotsers like Cricut or Silhouette. For creators, educators, and small business owners, understanding how to leverage these assets can streamline the transition from digital concept to tangible product.
This guide explores the practical implementation of these layered designs, focusing on preparation, material selection, assembly techniques, and licensing compliance. By treating the digital file as the starting point of a structured manufacturing process, you can ensure consistent quality and maximize the utility of your purchase.
Understanding the Asset Structure and Compatibility
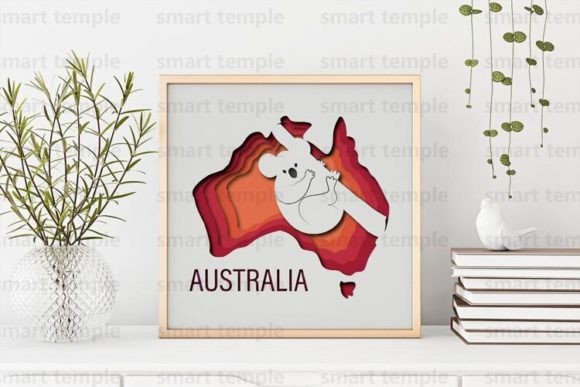
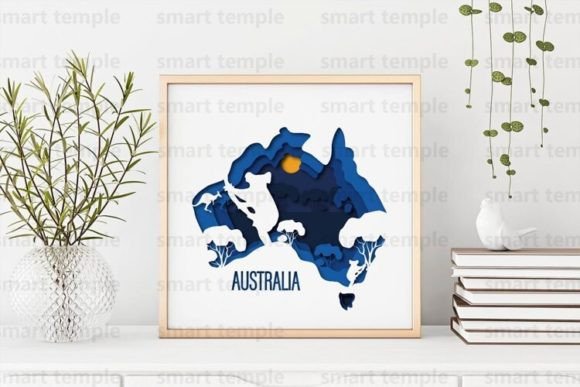
The core value of the Australia Papercutting SVG lies in its structural organization. Unlike standard single-layer clip art, this asset is a set of layers designed specifically for depth and dimensionality. When you download the archive, you receive files in SVG, DXF, and AI formats. This triad of formats ensures broad compatibility across different software ecosystems and hardware capabilities.
- SVG (Scalable Vector Graphics): Ideal for web-based design platforms and most consumer-grade cutting machines like Cricut Design Space or Silhouette Studio. It preserves vector data without rasterization.
- DXF (Drawing Exchange Format): The standard for industrial CNC machinery and older CAD software. If you are using a laser cutter with proprietary software that prefers DXF, this format ensures precise path recognition.
- AI (Adobe Illustrator): Best for professional graphic designers who need to edit anchor points, adjust bezier curves, or integrate the design into larger branding materials before sending it to production.
Before beginning any project, verify that your software can interpret layered files correctly. In many cases, you will need to ungroup elements and assign specific cut lines to each layer. This preparation phase is critical for avoiding misalignment during the physical cutting process. If you do not find a file format that suits your specific workflow, reaching out to the designer for conversion assistance is a viable option, ensuring your technical requirements are met before production begins.
Material Selection and Machine Configuration
The versatility of the 3D Australia design allows it to be executed in various materials, including wood, plywood, cardboard, and paper. However, each material interacts differently with cutting tools, requiring adjustments in speed, power, and blade depth.
Paper and Cardboard Applications
For intricate papercutting projects, standard cardstock or heavy-weight paper is recommended. The layered nature of the design means that tolerance is key. If the layers are too tight, assembly becomes difficult; if too loose, the structural integrity of the 3D effect is compromised. When using a Cricut or Silhouette, perform a test cut on a scrap piece of your chosen paper to calibrate blade pressure. Fine details in the Australian landscape motifs may require a fine-point blade and slower cutting speeds to prevent tearing.
Wood and Plywood for Laser and CNC
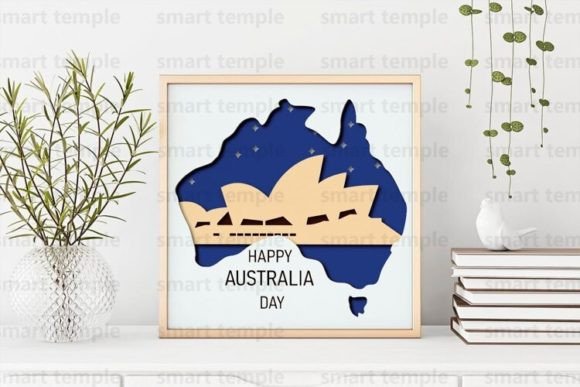
When transitioning to rigid materials like plywood or basswood, the Australia Papercutting SVG serves as a template for shadow boxes or wall art. Laser cutters excel here, providing clean edges that minimize post-processing. For CNC routing, consider the bit size relative to the smallest details in the vector file. A 1/8-inch end mill may not capture fine interior cuts, so you may need to simplify certain layers or use a smaller bit for detail work. Plywood offers a natural aesthetic that highlights the grain, making it suitable for rustic or organic interior design themes.
Assembly and Finishing Techniques
Cutting is only half the process. The visual impact of the 3D Australia design is realized during assembly and finishing. The layered approach creates depth, but this depth must be managed physically using spacers or adhesive strategies.
Layering and Spacing: To achieve the 3D effect, you must separate the layers. Foam tape is a common solution for paper and cardboard projects, providing both adhesion and elevation. For wooden assemblies, small wooden blocks or specialized standoffs can be used. Ensure that each layer is aligned perfectly before securing it permanently. Misalignment at this stage is difficult to correct and can detract from the professional appearance of the final piece.
Painting and Surface Treatment: If you choose to paint your creation, acrylic paint is the most versatile option. Apply 3-4 coats for full coverage, allowing each coat to dry completely to prevent warping, especially in paper or thin plywood. Painting before assembly is often easier, as it allows you to reach intricate cutouts without worrying about overlapping layers. Alternatively, painting after assembly can create a unified look where the layers blend seamlessly. For wood, consider staining or sealing instead of painting to preserve the natural texture.
Workflow Integration for Professionals and Entrepreneurs
For small business owners and freelancers, the Australia Papercutting SVG can be integrated into a broader product line. The ability to resize the files without loss of quality means you can adapt the design for various applications, from small greeting cards to large wall installations. This scalability supports a flexible inventory strategy, allowing you to respond to customer requests for different sizes and materials.
Quality Control and Consistency: When producing multiple units, establish a standardized workflow. Document your machine settings for each material type, including speed, power, and blade depth. Create a checklist for assembly steps to ensure every product meets the same quality standards. Consistency is crucial for building brand reputation, especially when selling finished products online or at craft fairs.
Time Management: Layered designs require more time for assembly than single-layer cuts. Factor this into your pricing and production schedule. Batch processing can improve efficiency; cut all layers for multiple units at once, then move to assembly. This reduces the setup time per unit and streamlines the production pipeline.
Licensing and Ethical Use Guidelines
Understanding the licensing terms is essential for professional use. The purchase of the Australia Papercutting SVG archive grants you the right to use the design for personal projects and to sell finished physical products. This means you can cut, paint, and hang the artwork or gift it to friends. You can also sell the physical items you create, such as framed wall art or decorative boxes.
However, there are strict limitations. It is forbidden to resell the design in digital form. You cannot distribute the SVG, DXF, or AI files to others, nor can you post them on other sites, whether for free or for sale. This restriction protects the intellectual property of the creator and ensures that the value of the design remains tied to the craftsmanship of the physical product, not the digital file itself. Adhering to these guidelines maintains ethical standards in the creative community and supports sustainable design practices.
Troubleshooting and Customization
Even with high-quality files, issues may arise. If the layers do not align correctly, check your software settings for scaling. Ensure that the aspect ratio is locked when resizing to prevent distortion. If certain details are too fragile for your chosen material, consider modifying the vector file in Adobe Illustrator or similar software. Thickening narrow connections or removing overly intricate elements can improve durability without compromising the overall aesthetic.
If you encounter technical difficulties with file formats or need specific adjustments, communication with the designer is encouraged. Many creators are willing to assist with format conversions or minor edits to ensure customer satisfaction. This collaborative approach can resolve issues quickly and enhance your overall experience with the asset.
In conclusion, the Australia Papercutting SVG and 3D Australia designs offer a robust foundation for creative projects. By focusing on proper preparation, material compatibility, and efficient workflow integration, you can transform these digital assets into high-quality physical products. Whether for personal enjoyment or commercial sale, these tools empower creators to produce professional-grade results with precision and consistency.