Creating a San Francisco California 3D Shadow Box: A Workflow for Digital Crafters
Integrating digital design assets into physical crafts requires a clear understanding of file compatibility, layer management, and assembly logistics. For creators, small business owners, and hobbyists, the San Francisco California 3D Shadow Box represents more than just a decorative item; it is a structured project that bridges digital precision with tactile artistry. Whether you are producing a single piece for personal enjoyment or scaling up for a small e-commerce venture, understanding how this template fits into your creative workflow is essential for achieving professional results.
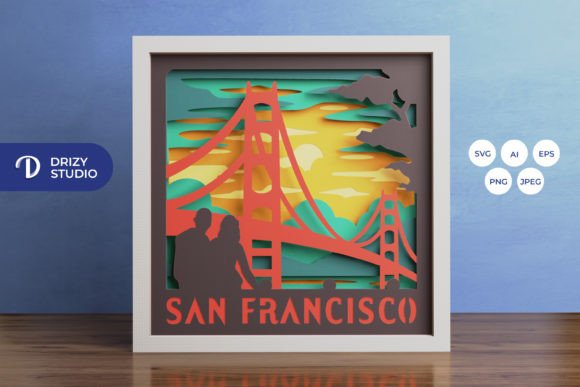
This layered, square paper-cutting template captures the iconic skyline and atmosphere of San Francisco. By breaking down the process into preparation, execution, and finishing stages, you can ensure consistency and quality in every build. The following guide explores how to effectively utilize the USA 3D Shadow Box template within your existing creative or business processes.
Understanding the Asset Structure and File Compatibility
The foundation of any successful paper craft project lies in the quality and format of the source files. The San Francisco California 3D Shadow Box template is provided in multiple formats to accommodate various tools and workflows. Understanding which file type serves which purpose is the first step in efficient planning.
- SVG (Scalable Vector Graphics): This is the primary format for users with electronic cutting machines such as Silhouette or Cricut. The vector nature of SVG ensures that lines remain crisp regardless of resizing, provided the aspect ratio is maintained.
- AI and EPS: These formats are ideal for professional designers using Adobe Illustrator or similar vector software. They allow for deep customization, such as modifying specific architectural elements or adjusting layer depths before exporting to a cutter.
- PNG and JPEG: High-resolution raster images (714 x 714 px for PNG, 3000 x 2000 px for JPEG) serve as visual references or preview assets. They are useful for marketing materials, social media previews, or manual tracing if digital cutting tools are unavailable.
For those integrating this asset into a broader design system, the consistent dimensions of 714 x 714 pixels across vector and high-res raster formats simplify file organization. This uniformity reduces the time spent on resizing or aligning assets during the pre-production phase.
Preparation and Material Selection
Before initiating the cutting process, proper preparation ensures that the final assembly proceeds smoothly. The template consists of six distinct layers, each contributing to the depth and narrative of the scene. Selecting the right materials is critical for both structural integrity and aesthetic appeal.
Paper Weight and Texture
The choice of paper affects how light interacts with the layers, especially if you plan to create a lightbox. Cardstock between 160gsm and 250gsm is generally recommended. Heavier paper provides rigidity, preventing sagging in the center of the frame, while lighter paper may allow for more intricate detailing but requires careful handling. Consider using varied textures or subtle color gradients to enhance the visual separation between the foreground and background elements of the San Francisco skyline.
Tool Readiness
If you are using a cutting machine, ensure your blades are sharp. Dull blades can tear paper fibers, resulting in fuzzy edges that detract from the clean look of the shadow box. For manual crafters using art knives and scissors, a self-healing cutting mat and a metal ruler are indispensable for maintaining straight lines and protecting work surfaces.
Execution: Cutting and Layer Management
The execution phase involves translating the digital file into physical components. Efficiency here depends on organization and attention to detail.
When using a Cricut or Silhouette machine, import the SVG file directly. Verify the scale settings to match your desired output size, keeping the aspect ratio locked to prevent distortion. The template is designed for a final size of 20.32×20.32 cm, but it can be resized to fit larger frames if needed. However, remember that increasing the size may require thicker paper to maintain structural stability.
Labeling each layer immediately after cutting is a best practice that saves significant time during assembly. Use painter’s tape or sticky notes to mark the front and back of each piece. Since the USA 3D Shadow Box relies on precise stacking, confusing the order of layers can disrupt the intended depth effect. Organize your workspace by laying out the layers in sequence, from background to foreground, to visualize the progression of the scene.
Assembly Techniques and Structural Integrity
Assembly is where the two-dimensional cuts transform into a three-dimensional narrative. The method you choose for adhering layers will impact both the durability and the visual depth of the final piece.
Using Spacers for Depth
To achieve the signature shadow box effect, you must create physical distance between the layers. Foam tape, double-sided mounting squares, or hand-cut cardstock spacers can be used. Foam tape is often preferred for its ease of use and consistent thickness. Apply spacers strategically to the back of each layer, focusing on areas that need support without obscuring key design elements.
Start with the background layer and adhere it to the base of the frame or backing board. Proceed layer by layer, ensuring each piece is centered and aligned. Use a light source behind the assembly during this stage to check for unwanted gaps or misalignments. This real-time quality control helps catch errors before the glue sets permanently.
Integrating Lighting Elements
One of the most impactful enhancements for this project is the addition of LED strips. Placing lights between specific layers can highlight architectural details of the San Francisco landscape, such as the Golden Gate Bridge or city buildings. When planning for lighting, consider the power source placement. Battery-operated LED strips are easier to conceal within the frame’s border. Ensure that wires are tucked neatly behind layers to maintain a clean appearance.
If you are creating a lightbox, use translucent paper for certain layers to diffuse the light softly. This technique adds atmospheric depth and mimics the foggy ambiance often associated with San Francisco. Test the lighting setup before finalizing the assembly to adjust brightness and color temperature according to your preference.
Quality Control and Final Presentation
Once assembled, inspect the San Francisco California 3D Shadow Box for any visible glue residues or misaligned edges. Clean up any stray fibers or dust particles using a soft brush or compressed air. Frame the artwork using a deep-set shadow box frame that accommodates the total depth of the six layers plus any spacing material.
For professionals selling these items, consistency is key. Document your process, including paper brands, spacer thicknesses, and lighting configurations. This documentation allows you to replicate successful outcomes and streamline future production runs. It also helps in troubleshooting if a batch does not meet quality standards.
Strategic Uses and Gift Giving
Beyond personal decoration, this template offers versatility for various applications. It serves as an excellent gift for friends, family, or colleagues who have a connection to San Francisco or appreciate unique handmade decor. For educators, it can be a practical project to teach students about layering, perspective, and digital fabrication.
Entrepreneurs and small business owners can incorporate this design into their product lines. The ability to customize colors and sizes allows for targeted marketing campaigns. For instance, offering a version with specific team colors or corporate branding can appeal to business clients looking for distinctive office decor.
Remember that the images provided in the product preview are for reference only. The final product color may vary slightly due to lighting sources and the specific paper color chosen. Embrace these variations as part of the handmade charm, but ensure that your material choices align with the intended aesthetic.
Conclusion
The San Francisco California 3D Shadow Box is a versatile asset that fits seamlessly into both hobbyist and professional workflows. By understanding file formats, preparing materials meticulously, and executing assembly with precision, you can create a high-quality piece of art. Whether used as a personalized gift, a decorative lightbox, or a product for resale, this template offers a structured path from digital file to tangible masterpiece. Get this San Fransisco California 3D Shadow Box now and make your own, integrating it into your creative routine with confidence and clarity.